If you’ve ever hosted a Halloween party or even just set out a few bowls of candy, you know how fast the table can start to look a little plain. The snacks are there, the candles might be lit, but it doesn’t feel styled. A centerpiece changes that instantly. It ties everything together, makes the whole space feel intentional, and gives your guests something to admire before they even touch the food.
The best part is you don’t have to spend hours or lots of money. These DIY Halloween centerpieces are simple, affordable, and you can actually finish them in one afternoon. Whether you love creepy, cute, or chic, there’s an idea here that will take your table from boring to unforgettable.
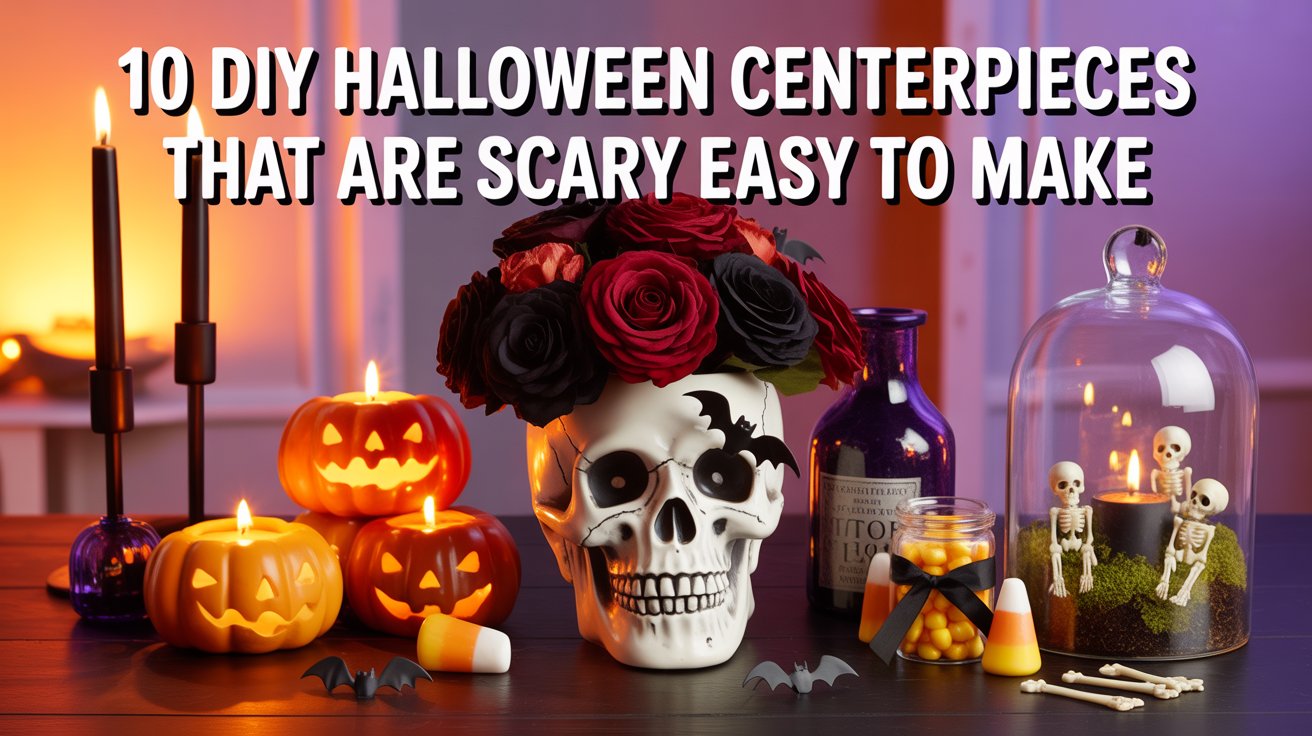
1. Pumpkin Candle Holders
Pumpkins and candles are classic Halloween staples, so combining the two is an easy win. Carving out mini pumpkins to hold candles creates a warm, flickering glow that feels cozy and festive at the same time.
- What you need: Small pumpkins, knife, spoon, tea light candles or flameless candles.
- How to do it: Cut the tops off the pumpkins and scoop out just enough space to hold your candles. Place one candle in each pumpkin and group them in the center of your table.
- Extra tip: Mix traditional orange pumpkins with white and painted black ones for more contrast.
This centerpiece is simple, seasonal, and always gets compliments.
2. Skull Vase Arrangement
A skull filled with flowers is equal parts creepy and chic. It’s the kind of centerpiece that looks like something you’d buy in a specialty shop but is surprisingly easy to DIY.
- What you need: Hollow plastic skull, fresh or faux flowers, floral foam, glue.
- How to do it: Cut an opening in the top of the skull, place floral foam inside, and arrange your flowers until it looks full and dramatic.
- Extra tip: For a moody vibe, use black or deep red blooms. If you want playful, stick to orange and purple.
This one adds a bold focal point to your table and photographs beautifully.
3. Black Branches in a Cauldron
This centerpiece has height and drama, which makes it perfect for large tables or buffets. A cauldron filled with tall black branches gives your space an instant spooky vibe.
- What you need: Cauldron, branches, black spray paint, moss or filler.
- How to do it: Spray paint the branches black and place them in the cauldron. Fill the bottom with moss or spider webbing to hold them in place.
- Extra tip: Hang little bats or ghosts from the branches to make it interactive.
It looks like you spent a lot of time on it, but it only takes a few minutes to put together.
4. Haunted Lanterns
Lanterns add cozy light on their own, but with a Halloween twist, they become eerie. This centerpiece looks high-end but is as easy as layering a few spooky details inside.
- What you need: Lanterns, spider webbing, plastic spiders, flameless candles.
- How to do it: Stretch fake spider webbing inside your lanterns, tuck in a few spiders, and add candles in the center.
- Extra tip: Use colored LED candles in orange or purple for a festive glow.
This one is timeless, reusable, and works on both tables and mantels.
5. Witch’s Potion Bottles
Potion bottles instantly make any table look styled. Grouping them together feels like stepping into a witch’s cabinet, and it’s a detail your guests will remember.
- What you need: Glass bottles, printable potion labels, glue, food coloring, black spray paint.
- How to do it: Age your bottles with paint or leave them clear. Add labels and fill with colored water for effect.
- Extra tip: Vary the bottle sizes and shapes to make it look more authentic.
They’re inexpensive, easy, and one of the quickest ways to create a styled Halloween centerpiece.
6. Creepy Crawly Terrarium
Terrariums always look elegant, and when you give them a Halloween twist, they become eerie and eye-catching. They’re perfect for small tables or grouped in clusters.
- What you need: Glass cloche or vase, moss, mini skeletons, spiders, flameless candle.
- How to do it: Fill the base with moss, add your skeletons and spiders, and finish with a candle. Cover with the cloche.
- Extra tip: Make a few in different sizes and display them together for extra impact.
They look like boutique décor pieces but cost almost nothing to make.
7. Candy Corn Jars
Candy corn pulls double duty as a snack and décor. When you fill clear jars with it, the bright colors instantly bring your table to life.
- What you need: Glass jars, candy corn, ribbon.
- How to do it: Fill jars to the top with candy corn and tie ribbon around the lid or rim. Group a few jars together in the center of your table.
- Extra tip: Surround them with mini pumpkins or candles for a layered look.
It’s festive, colorful, and a guaranteed hit with kids and adults alike.
8. Bat Tree Centerpiece
If you want something tall and dramatic, a bat tree is the way to go. It’s essentially branches decorated with paper bats, but the effect is so striking.
- What you need: Branches, black cardstock, scissors, tape, vase or container.
- How to do it: Cut bats in different sizes from the cardstock, fold their wings slightly, and tape them to your branches. Place the branches in a vase.
- Extra tip: Spray paint the branches black for an even spookier look.
This centerpiece is bold, unique, and looks amazing as a backdrop for party photos.
9. Pumpkin Vase
Pumpkins don’t have to just sit on your porch. Hollowing one out and turning it into a vase gives you a natural, festive container for flowers.
- What you need: Medium pumpkin, knife, spoon, jar or cup, flowers.
- How to do it: Cut off the top, scoop out the inside, and place a jar inside to hold water. Arrange your flowers in the jar so the pumpkin acts as the vase.
- Extra tip: Choose black and deep purple flowers for a gothic look, or go with bright orange and yellow for fall warmth.
It’s elegant, seasonal, and makes a big impression on your table.
10. Haunted Birdcage
A birdcage filled with spooky accents is one of those centerpieces that feels like it belongs in a styled magazine spread. It gives you height, texture, and lots of room to get creative.
- What you need: Birdcage, moss, mini skeletons, spiders, crows, flameless candles.
- How to do it: Fill the cage with moss, layer in skeletons and spiders, and place a candle inside. Perch a raven or bat on top for drama.
- Extra tip: Use a mix of candles in different heights to give it depth and glow.
It looks elaborate but is surprisingly easy to pull together in under an hour.
Quick Recap
- Pumpkins, skulls, and flowers give you classic seasonal style.
- Branches, birdcages, and terrariums add height and drama.
- Lanterns, potion bottles, and candy corn jars keep it festive and fun.
Final Thought
The difference between a plain table and one that feels styled is almost always the centerpiece. With these DIY Halloween centerpiece ideas, you don’t need to spend a lot of money or time to create something that looks intentional and high-end. Try one for a small dinner party or combine a few for a full Halloween spread. Either way, your table will go from simple to spooky in the best way.


